Thursday, January 13, 2022

Full SD Card image of GBTPi with Raspbian OS Buster Version

 A shortcut way to install GBTPi on your Raspberry Pi is to do it in one step by downloading a complete SD card image from Dropbox. 

What you need:

  • A Raspberry Pi 4 model B.
  • An Internet connection.
  • A Windows computer to download the disk image
  • An SD card reader (USB or built-in computer).
  • A 32 GB SD card.
  • A micro-SD / SD adapter (often included with the SD card).
  • A copy of Win32DiskImager installed on your Windows PC
  • You may need a copy of SDCardFormatter to format your SD card

Follow these steps:

 1) Download the SD card image to a file on your PC using this link. It is 32GB so it may take some time depending on your connection speed.

https://www.dropbox.com/s/7whb5g1qoeit2jy/GBTPiDiskImage220112.img?dl=0

2) Download and install Win32DiskImager onto your PC.

3) Run Win32DiskImager and select the SD card image file and your SD card device.


4) Write the image to your SD card

5) Boot your Raspberry Pi with the SD card.

You will have GBTPi (free trial version) installed on Raspbian ready to run. Raspbian is setup to run headless and with HQ camera support enabled.

You should check to see if there is a newer version of GBTPi available for download from this link...

  https://www.granitebaysoftware.com/Download/DownloadAll.aspx?id=rpi

installing the Buster version of Raspbian

GBTPi (GBTimelapse for Raspberry Pi) requires the Buster version of Raspbian. At the time of this writing the newer Bullseye version is unstable and is missing critical components. 

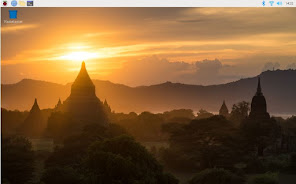
Buster Desktop

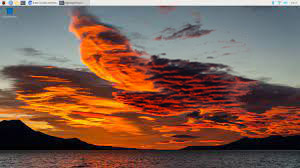
Bullseye Desktop

If you aren't running Buster, you can download Raspbian Buster onto a SD card using a Windows PC or Mac. Then insert the SD card into your Raspberry Pi. and reboot. 

What you need:

  • A Raspberry Pi 4 model B.
  • An Internet connection.
  • A computer (Windows, Mac, or Ubuntu) to download and flash Raspberry Pi OS.
  • An SD card reader (USB or built-in computer).
  • A minimum 32 GB SD card.
  • A micro-SD / SD adapter (often included with the SD card).
  • A complete Raspberry Pi setup with screen and keyboard.

Follow these steps:

1) Download the Raspberry Pi disk imager onto your PC or Mac from this link… https://www.raspberrypi.com/software/

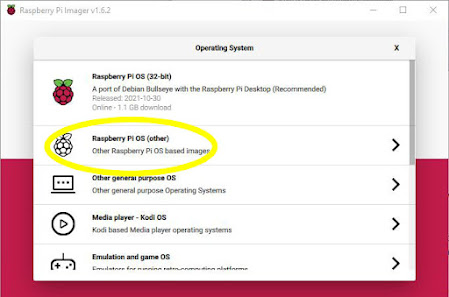
2) Install and run the Raspberry Pi Imager on your Pc or Mac and click “Choose OS

3)  Select “Raspberry Pi OS (other)”.  


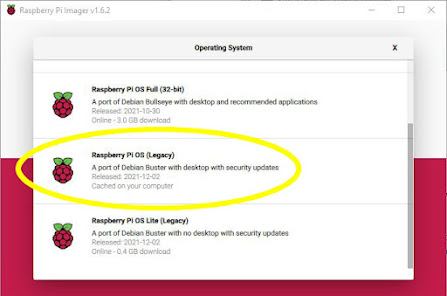
4) Select "Raspberry Pi OS (Legacy)" , a port of Debian Buster with desktop


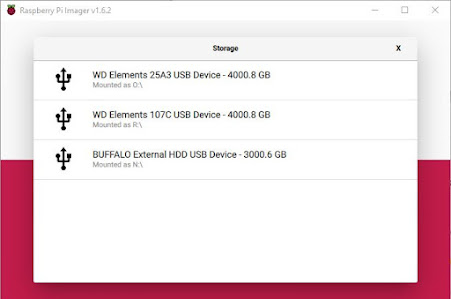
5) Click “Choose Storage” and select the device for your SD card (not shown in the image below)


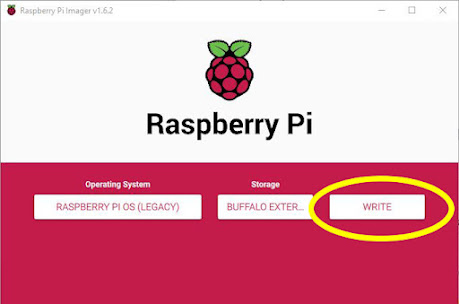
6) Click “Write” to copy the OS to your SD card


7) Insert the SD card in your Pi and power up.


Thursday, December 23, 2021

Focusing the Raspberry Pi HQ Camera

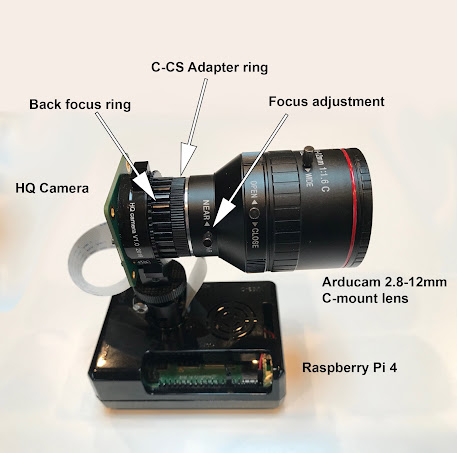
 Here's the procedure I use to focus the Raspberry Pi 12MP HQ Camera. In this example I am using the Arducam 2.8-12mm C-mount lens.

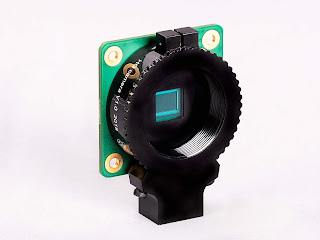
12MP HQ Camera
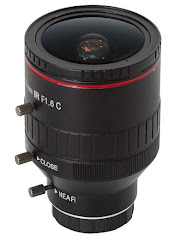
Arducam 2.8-12mm Lens


Initial Focus Procedure


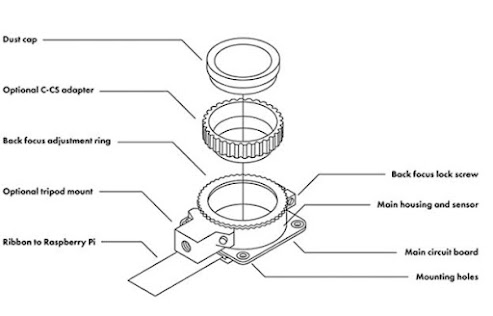
1) Loosen the HQ camera back focus lock screw and insure the back focus ring is screwed all the way into the camera (clockwise).

2) Since the Arducam Lens has a C-mount, you need to screw the C-CS adapter into the HQ Camera.

3) Screw the lens into the C-CS adapter.

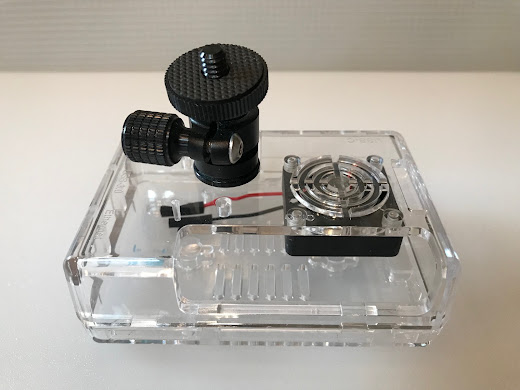
HQ Camera attached directly to a Raspberry Pi case using a mini ball head.

4) Being careful to not unscrew the lens, the C-CS adapter or the back focus ring; adjust the lens focus to the "FAR" setting.

5) Aim the camera at something far away.

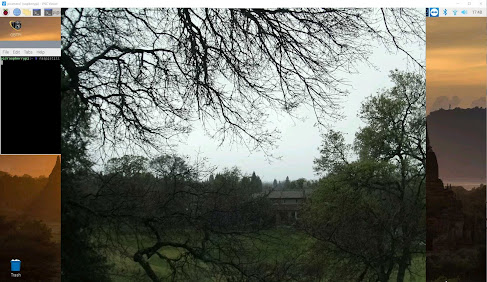
6) In a Raspbian terminal window type "raspistill -t 0" to stream the camera image to a screen.

"raspistill -t 0" streaming to a monitor

7) As you watch the screen, slowly unscrew the back focus ring until you get a sharp image. Then the assembly is aligned for the FAR focus setting.

8) Tighten the back focus screw.

9) Test the configuration by using the lens focus ring to focus on something near.

--------------------------------------------------------------------------------------------------------------

Reference

HQ Camera assembly


Some Pi cases are pre-drilled to facilitate attaching a camera

Saturday, September 18, 2021

DIY Raspberry Pi Long-Term Unattended Time-lapse

GBTPi is designed to for long-term unattended operation. It inherits GBTimelapse’ powerful and versatile scheduling and camera control abilities. GBTimelapse has been used for over a decade in hundreds of long-term installations worldwide.

Periodic images can be captured over a period of days, weeks or months to document the progress of a project. The camera and computer can run indefinitely. Progress is monitored by email alerts from the capture software or by remote access software. Images can be emailed periodically or uploaded via FTP. GBTPi can automatically convert the images sequences into time-lapse videos.

  • Set begin/end at fixed times of day or times relative to sunrise and sunset
  • Specify a schedule of different capture intervals at different times of day
  • Define different capture schedules for days of the week
  • Automatically makes a video for each day or session
  • Sends emails sample images to you periodically or uploads FTP images
  • Manages Raspberry Pi image storage like a DVR by keeping the most recent
  • Remotely monitor and control over the internet with a wi-fi or Ethernet connection
  • Download videos and/or images over the internet


Internet Connection Options

  • Use an Ethernet cable if available.
  • Use the RPi internal wi-fi if you have a strong wi-fi signal.
  • Use a wi-fi extender if you have a weak wi-fi signal.  Bearifi Extender $58

Parts List


Tuesday, December 10, 2019

GBTimelapse4 Long-Term Indoors

Raw Fit Training Gym Case Study

Time-lapse of a Gym's classes automatically created and published to YouTube.

A local gym owner wanted to keep track of the morning classes every day so I installed a camera and GBTimelapse4 Pro (GBT4) inside his gym with a clear view of the floor. GBT runs on a ACEPC mini-PC and controls a Canon T2i DSLR.

I created three GBT4 projects, one for each of the three morning classes (5AM, 6AM, and 8:30AM). Each project was set to a 4.5 second interval, a start time to match the start of the class and an end time 55 minutes later. Each project was also set to automatically start and to exit GBT4 when completed.

I then created three windows Windows Task Scheduler tasks, with each one starting GBT at the class start time and with the name of the corresponding GBT project file. Each task was set to only run on the weekdays when the gym is open.

I also created a Windows task to start GBTManager (GBTM) later in the morning after the classes were done. GBTM runs FirstCutTimelapse (FCT) on that mini-pc to make videos (full-frame HD) for each of the three classes.  FCT is configured to overlay the date/time, a RawFit watermark, and other info on the video.

The videos are created into a Google Drive folder and a Zapier "zapp" publishes each new Google Drive video to the owner's YouTube page.,


GBTManager manages the mini-PC's storage much like a digital video recorder. It keeps all the images and videos until the drive gets full and then deletes the oldest ones. This PC has a 256GB SSD enough to keep a history going back over 120 days. A drive up to 4TB could be installed for a much longer history.


Wednesday, December 04, 2019

GBTimelapse 4 Long-Term Unattended Operation


Timelapse Workflow


Windows 10 Task Scheduler starts a GBTimelapse session with the name of a project file at set times-of-day (and/or days of week).  It also starts GBTManager at a later time each day.

GBTimelapse controls the camera and captures images according settings stored in the project file.

GBTManager starts FirstCutTimelapse to make a video for each new GBTimelapse session. It also manages drive storage to delete old session images and videos - much like a digital video recorder.

Google Drive uploads the videos and/or images to the cloud.

Zapier publishes each new video to YouTube or Vimeo.


What you need:

·         GBTimelapse 4 Pro, includes GBTManager ($199)
·         FirstCutTimelapse ($29)
·         Canon EOS camera (EOS M200 $499)
·         Windows 10 Mini-PC or laptop ($189 ACEPC)
·         Remote Access Software (TeamViewer free account)
·         Cloud storage (Google Drive, Dropbox, OneDrive…free)
·         Zapier to auto upload to YouTube or Vimeo (free)
·         Optional: Outdoor enclosure
·         Optional: Wi-Fi extender

GBTimelapse 4 Pro Version

A GBTimelapse project file can be configured to start and end at fixed times per day or times relative to local sunrise and sunset times. Windows Task Scheduler can start GBTimelapse with a named project file, so you can run multiple projects per day or different project on different days resulting in one or more time-lapse sessions per day. The included GBTManager invokes FirstCutTimelapse to create a video for each time-lapse session.

FirstCutTimelapse

FirstCutTimelapse reads the session images and creates a video file. You specify the video aspect ratio, dimensions, cropping, and optionally other watermarked information.

Canon EOS camera

GBTimelapse4 is compatible with virtually all Canon EOS models. For long-term operation mirror-less models (EOS M200, EOS RP, & EOS R) are best because they don’t have a mirror mechanism that might malfunction after 100,000 or more images.

Windows 10 Mini-PC or laptop

There is no need to have a full size Windows PC. A mini-pc inside an outdoor enclosure or small laptop for an indoor installation are both perfectly capable. The PC should run Windows 10 and must have at least 4GB Ram, 64GB C-Drive, Wi-Fi or Ethernet, 3 USB ports, HDMI display connection. You will also need a keyboard, mouse and HDMI monitor for initial setup. After that you can connect and configure using remote access software like Team Viewer.
The PC should be configured to auto-boot on power on. That way if the power ever fails the PC will reboot and resume operation when the power returns.
The  ACEPC-AK1 ($189) is a proven platform this workflow. Its 64GB C-drive is sufficient for small projects, but for longer sessions or RAW capture it’s best to add an internal D-drive like the Samsung 860 EVO 2.5” SATA 250GB ($59).

Remote Access Software

You need remote access software to configure and monitor the PC while it is running remotely. You can get TeamViewer free account or you can configure Windows Remote Desktop.

Cloud Storage

Google Drive is a good solution for uploading the videos and/or images to the cloud. A free Google Drive account can accept up to 15GB. We recommend getting a Gmail account and Google Drive account for each long-term installation. Just set FirstCutTimelapse to output videos to the Google Drive folder.

Zapier

Use Zapier to create a “Zap” to automatically publish a video to YouTube whenever a new video is added to your Google Drive folder.

Tuesday, August 16, 2016

DIY Motion Control - "Loco Moco"

With some inexpensive hardware you can build a simple motion control system for your time-lapse work.


The interface between the computer and the locomotive uses two inexpensive Phidget devices.


You can get these parts directly from Phidget...

Phidget Interface Kit 2/2/2
http://www.phidgets.com/products.php?product_id=1011

Phidget SSR Relay Board
http://www.phidgets.com/products.php?category=9&product_id=3052_1


Tuesday, August 11, 2015

Restoring an Icon - GBTimelapse Involved in Unique Project

Enjoy a front-row seat to the restoration of the USS Constitution, the world’s oldest commissioned warship afloat and America’s Ship of State.  GBTimelapse user Greg Cooper was retained by the USS Constitution Museum to document the three-year restoration project. 


Constitution Cam
The Constitution Cam displays photographs from a unique vantage – outside a third floor window of the USS Constitution Museum. The image will automatically refresh every few minutes.
http://usscm.org/restoration/constitution-cam/

About the Restoration Project Using Time-Lapse Photography
Read about the project and the use of time-lapse photography and GBTimelapse in Greg's documentation in his own words below...

The USS Constitution Museum retained me to document the three-year restoration of the USS Constitution which is taking place in Dry Dock 1 at the Charlestown Navy Yard. I chose to document this historic event using time-lapse photography in order to generate a time-lapse movie of the event. The equipment includes a Canon DSLR camera and a mini computer running Windows operating system with an internet connection in an all-weather housing. The higher end Cannon DSLR cameras do not have a built-in intervalometer to capture images at a predetermined time and requires an external shutter release with a built-in intervalometer. Basic intervalometer devices can control the interval at which images are captured, for example, once every five minutes. However, they cannot control the times of day when images are captured, for example, only between 6am and 10 pm. There is little to no activity at the dry dock during the evening hours. Images captured during this time would be unnecessary and require extra data transfer, storage and management. I needed a tool that could control both the interval and the time of day that pictures are captured. I found Granite Bay Software to be the best solution. I run Granite Bay software on the mini computer to remotely control not only the interval and timer period of image capture but also to modify the script that controls other camera settings. With Granite Bay Software, I can also transfer images using its built-in ftp protocol to an offsite server. That server has custom viewing software that I developed and which allows the visitor to view images from specific dates and times. In addition, the website dynamically builds a video clip of the restoration progress each night for client viewing. The museum continually showcases the most recent image on their blog during the restoration process and provides a direct link to the viewing software website. The capabilities of Granite Bay Software enables me to provide these services to my client.

About the USS Constitution
The 2015 restoration marks the first time that USS Constitution has been dry docked in the 21st century. Dry Dock 1, in the Charlestown Navy Yard, is the second oldest operational dry dock in the United States and Constitution was the first warship to enter that dock on June 24, 1833. The work of this restoration will include replacing the lower hull planking and caulking; removing the 1995 copper sheathing and replacing it with 3,400 sheets of new copper that will protect the ship’s hull below the waterline; replacement of select deck beams; and on-going preservation and repair of the ship’s rigging, upper masts, and yards. The cost of the restoration is expected to be $12-15 million and will be paid for by the U.S. Navy.

Thursday, June 18, 2015

GBDeflicker4 is now available!

GBDeflicker4 is now available!  AND...it is compatible with Adobe CC 2015 and 2017!
GBDeflicker4 is a major release version from Granite Bay Software with increased speed and support for 32-bit color!

As many of you know, the GBD3 (GBDeflicker3) plugin is designed for Adobe CS6, CC and CC 2014.  GBD3 was designed correctly for CC and CC 2014, but the new Adobe CC 2015 is so different internally, they aren't compatible.  Good news...we have a solution!  We have released GBDeflicker4, a totally compatible plugin for Adobe CC 2015.

GBDeflicker users have a few options:
  1. Upgrade! - If you purchased GBD3 or a prior version on or after January 1, 2016, you are eligible for a free upgrade to GBD4.  If you purchased GBD3 or a prior version before January 1, 2015, you are eligible for discounted  upgrade price.
  2. Continue to Use Your Current GBDeflicker - GBD3 will still work with Adobe CS6, CC and CC 2014 and GBD2 will still work with CS5, CS5.5 and CS6 (64-bit). 
After Effects for CC 2015 has been redesigned with the Adobe release of CC 2015, so releases of GBD3 prior to April, 2015 will crash when run on CC 2015. GBD3 will warn the user, but it will crash if the user attempts to run GBD3 on CC 2015.

GBDeflicker4 - Upgrade Today!

GBD Version  Released OS Versions  Adobe Compatibility
-------------------  -------------  ------------------  --------------------------------------
GBDeflicker4  6/2015     64 bit OS      CC 2015 and CC 2017
GBDeflicker3  1/2014      64 bit OS      CC 2014, CC, and CS6
GBDeflicker2  3/2011      64 bit OS      CS6, CS5.5, and CS5
GBDeflicker1  3/2007     32 bit OS      CS4 and CS3

Thursday, January 29, 2015

GBDeflicker - Analyze faster with new version 3.1.1

GBDeflicker version 3.1.1 is now available and focuses on improving the analyze process using several speed enhancements.

Before you can render, GBDeflicker3 scans through your clip analyzing the amount of flicker. After you analyze, it removes the flicker when you render. We've made several improvements to GBDeflicker3 to speed up the analyze process.

We've also changed the effects "don't deflicker" option so that you can restrict the analyze process to only those parts of your video that have flicker. This too can greatly speed it up by not analyzing the parts of your video that have no flicker.


How to Start Using GBDeflicker 3.1.1

If you already own GBDeflicker3, just download and install this new update free of charge. If you own GBDeflicker2, now is a good time to upgrade at a reduced price.

GBTimelapse as a Slave to NMX or any Moco Device

GBTimelapse has extended its functionality with motion control systems to synchronize with virtually any motion control device that has a camera shutter release jack.

GBTimelapse previously had a list of supported motion control systems that included the Dynamic Perception MX2 and MX3 and the eMotimo TB3.  Now, GBTimelapse will work with virtually any motion control system that has a camera shutter trigger.

Typically, the camera jack connects to the camera shutter by a special cable. Instead of connecting the jack to a camera, you can now connect it to a Phidget 2/2/2 USB device attached to  a laptop computer  running GBTimelapse. When GBTimelapse is in the Slave/Phidget mode, it will wait and capture an image when the Phidget detects a motion control (moco) camera shutter release signal.

The image below shows GBTimelapse connected as a slave to a Dynamic Perception NMX motion controller. For clarity this image just shows the basic parts, not the motion control gear itself.  This set-up can be used in the identical way with any other system that has a camera shutter trigger.


The GBTimelapse laptop computer requires one Phidget 2/2/2 interface wired for a connection to its digital input by a mono jack. All you need is the Phidget and a female mono jack – the cable comes with the Phidget.

Just solder the yellow (digital input 0) wire and a black (ground) wire to the mono jack terminals.


You can get the Phidget 2/2/2 Interface here…

http://www.phidgets.com/products.php?product_id=1011

And the 2.5mm Female Mono Jack from Digi-Key (part number CP-2520-ND) here…

http://www.digikey.com/product-detail/en/MR-2501/CP-2520-ND/724799 

Follow the easy 6-step configuration below to get started!

Configuring GBTimelapse for Slave/Phidget Mode

Step 1Connect the moco device camera output to the Phidget using a mono or stereo 2.5mm male/male cable.

Step 2 - Enable Master/Slave and Phidget options in the GBTimelapse Tools/Options Feature tab.


Step 3 - Set the Phidget options to capture an image when digital input 0 is triggered.


Step 4 - Set GBTimelapse to run in Slave/Phidget mode.


Step 5 - Begin the time-lapse and GBTimelapse will wait for signals from the moco device.

Step 6 - Start the Moco device program. When the device sends a camera shutter signal GBTimelapse will control the camera and capture an image. GBTimelapse will follow its program and preform its AutoRamping controls adjusting Av, Tv, ISO as it normally does for flicker free “holy grail” time-lapse at sunset or sunrise.

Good luck!

Thursday, January 08, 2015

GBDeflicker - Analyze RAW images faster using a proxy

Do you shoot your time-lapse sequences in RAW?  If so, you definitely know how long RAW images take to load into Adobe After Effects. This process takes time because the RAW images are large and must be "debayered" (filter that converts RAW image data into an RGB image) before they can be displayed.

For example, a 400 frame RAW sequence takes about 12 minutes just to preview on my dual quad-core Windows machine. Similarly, it takes GBDeflicker about 12 minutes to analyze the RAW sequence before it can be de-flickered.

If you create a proxy file for your RAW sequence you can dramatically decrease the GBDeflicker analyze time. For my example of a 400 frame sequence, using the proxy reduced the analyze time from 12 minutes to only 50 seconds.  That is less than 10% of the time!

Please watch this short video to see how to use a proxy file for your RAW image time-lapse.

Friday, November 14, 2014

Wild Turkey Parade - BTS with GBTimelapse Automatic Unattended Operation

There are times when you need to capture an event, but you can’t spare the time to be there every day. If you can place your camera in a secure location, you can use GBTimelapse to capture the images automatically. It can start and stop at set times each day and automatically adjust the exposure for flicker-free capture.

Here’s a behind the scenes look at how I used GBTimelapse to capture the daily “Wild Turkey Parade“ across our property.


I placed a camera in an upstairs window with a view of the turkey’s daily route. I used a Bower 24mm manual lens with the aperture constant at f/5.6 to prevent any aperture flicker and I draped the back of the camera with a black cloth to block any window reflections.


I needed a wide angle lens to cover the unpredictable turkey wandering, but the full wide angle image included a bright sky and foreground.


To get the correct exposure in the middle ground, I used GBTimelapse’ new luminance region option. Instead of calculating the histogram over the full frame, you can specify an arbitrary sub-rectangle for the histogram. Here you can see the region I set to eliminate the sky and foreground. This guaranteed a proper exposure of the middle ground regardless of how bright the sky was. 


Because I was capturing large/fine jpegs with at 5760x3840, I was able to crop down to 1280x720 in After Effects and pan as the turkeys wandered across the full frame.


The turkeys start their parade just before dawn, but the sunrise time changes rapidly in the fall at this latitude. So, I set the GBTimelapse program to start every day at 25 minutes before dawn and to run for 30 minutes.


My initial exposure at that time before sunrise was about 2 seconds, f/5.6 and ISO 100. Each day was different because of the different cloud cover and lighting, but GBTimelapse AutoRamp would settle on a good exposure in just a few frames.

By using bulb mode, I was guaranteed to get smooth exposure changes with no Tv stepping as the scene brightened by more than 4 f-stops over the 30-minute period.


I set the GBTimelapse AutoRamp parameters to keep the bulb time between 1 and 2 seconds. Each time GBTimelapse adjusted the bulb time down to 1 second, it would halve the ISO and double the bulb time back to 2 seconds.


A 4 second interval with a 2 second exposure gave a nice “180 degree shutter” look to the video instead of the choppy look from a shorter exposure.

This may not be the most interesting video, but the techniques I used are very powerful!

For our professional clients...the ability to run automatically can greatly increase your productivity. You should consider it the next time you can place a camera in a secure location.

Wednesday, November 12, 2014

GBTimelapse 3.10 - Now with 3-axis eMotimo TB3 Control

Looking to achieve the time-lapse "holy grail" with your motion control gear?  You are in luck!  GBTimelapse 3.10 has added several features focused on achieving the elusive sunset, sunrise and overnight "holy grail."  Read on!

New Master/Slave Modes

GBT version 3.10 adds several new Master/Slave modes. These new modes enable you to get GBT’s Holy Grail AutoRamp power with virtually any motion control device!

As an added bonus, GBT 3.10 also...
  • Adds even greater compatibility with the eMotimo TB3 Black.
  • Adds the ability to synchronize multiple cameras connected on multiple computers (more about this in future posts).

New eMotimo Slave/TB3 mode features

  • Uses third axis for slider control (Rhino, Dynamic Perception or any other stepper).
  • Uses TB3 joystick setup parameters for 2 and 3-point moves,
  • or optionally use GBTimelapse control panel to setup all parameters for 2 and 3-point moves.
  • Enter TB3 mid and end-point Pan/Tilt positions precise degrees and slider position in inches or metric units.
  • No need to move the slider to the end-point, just type in its end value.
  • Save and Load all TB3 parameters from the computer for repeatability later.
  • Use GBTimelapse to schedule time-lapse start at a later time for unattended operation.
  • Uses GBTimelapse Holy Grail AutoRamp for bulb ramping and ISO control in changing light or day/night transitions.
  • Use GBTimelapse live-view screen for precise alignment of start and end points.
  • Use GBTimelapse history screen to see progress during a time-lapse session.
A three-axis demo...


A setup tutorial...


And TB3 driver/firmware installation...


Tuesday, September 30, 2014

GBTimelapse User Malin Perfects the Time-lapse Holy Grail!

Christoph Malin, world-renowned night sky film expert, has perfected the time-lapse "holy grail!"  In the world of time-lapse photography, this is a really BIG deal!

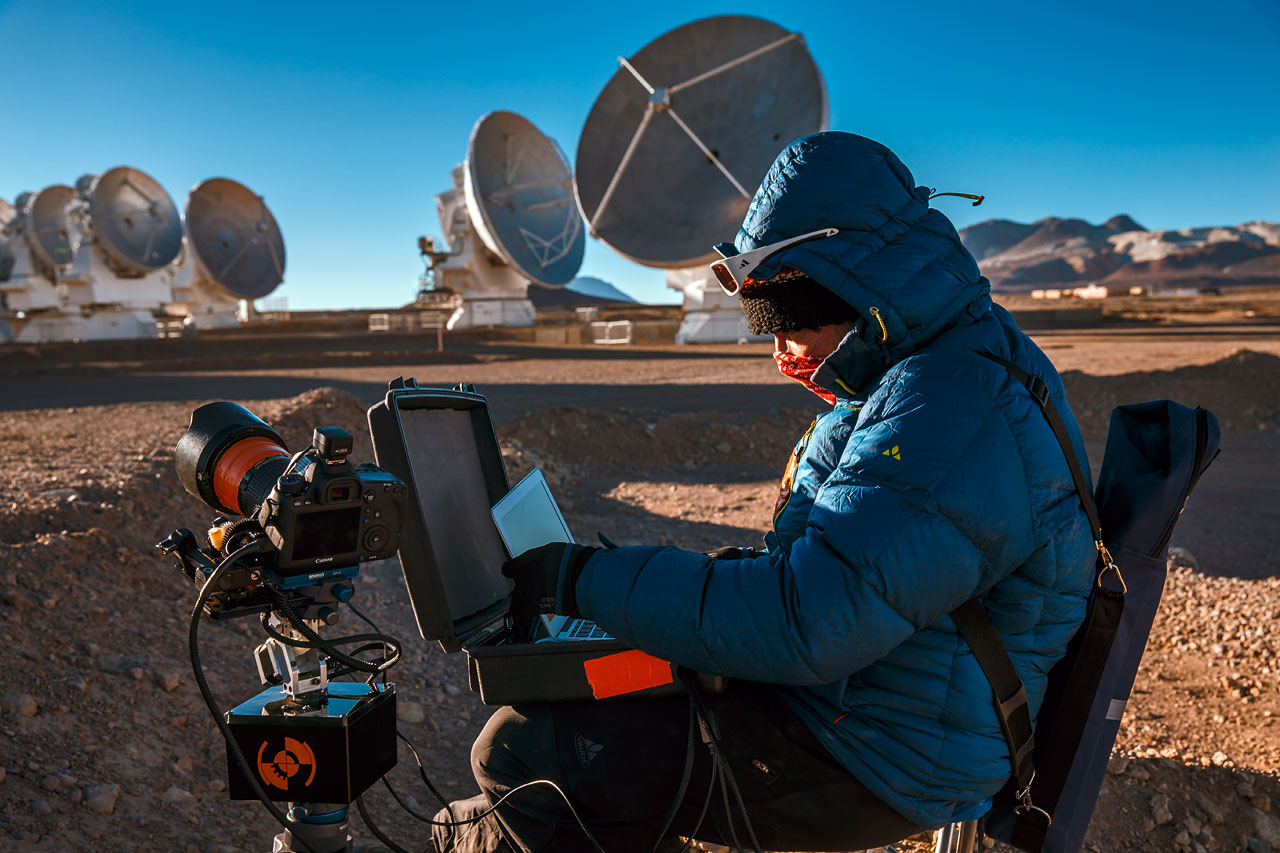
Malin uses GBTimelapse for all of his shots in The ESO Observatories:  Atacama Transitions and Landscapes under the Southern Sky, his latest video from the ESO Ultra HD Expedition.  Malin's use of GBTimelapse allows him to achieve the elusive sunset, sunrise and overnight "holy grail."  This video is comprised of a collection of great and unique day to night to day transitions under the Southern sky in Chile's Atacama desert.

Well done, Christoph!


The ESO Observatories: Atacama Transitions and Landscapes under the Southern Sky from Christoph Malin on Vimeo.

About the Video
Malin was on the ESO Ultra HD Expedition, sponsored by Granite Bay Software, when he shot this latest video.  You can learn more about the expedition HERE.

About the Rig
The rigs he calls "bots" have GBTimelapse controlling an eMotimo TB3 pan/tilt and a Dynamic Perception dolly. GBT uses it's AutoRamp algorithm to control the exposure along with an "aperture pull" during sunset and sunrise. He is able to start the rig in the afternoon, leave it over night and return in the morning. The result is two "holy grail" overnight shots, unattended!

The rig was described in a previous GBS blog post HERE.

ESO Ultra HD Expedition Resources
Twitter:  https://twitter.com/ESO
Hashtag:  #ESOultraHD
Facebook:  https://www.facebook.com/ESOAstronomy
Flickr:  https://www.flickr.com/photos/esoastronomy
YouTube:  https://www.youtube.com/user/ESOobservatory
Vimeo:  http://vimeo.com/esoastronomy
ESO URL:  http://www.eso.org/public/
Expedition URL:  https://www.eso.org/public/outreach/ultra-high-definition/

Friday, May 23, 2014

GBTimelapse and Meteor Showers

This past week Thomas O'Brien posted a time-lapse video 7 years in the making to Vimeo. That's right, 7 years! O'Brien's focus is shooting photos and video of meteor showers and for the past 7 years has been collecting footage that he has compelled into a beautiful 2-minute reel. He sent us a special message to tell us he used GBS software extensively throughout the process.

Various meteor atmospheric entries captures in a single frame reposted from O'Brien's blog.
O'Brien's recent post on his blog, http://muenchworkshops.com highlights the video and focuses on 10 tips on photograhing meteor showers.

This coming Memorial Day weekend should be a great opportunity to try out these tips and your time-lapse gear. As O'Brien wrote to us,
"The Earth is about to pass through a brand new debris field from a comet that came through this area of space back in the 1800's. We will be moving through the area on the 24th of May and it could be a great meteor shower."
Head over to O'Brien's post at http://muenchworkshops.com/blog/tips-for-photographing-meteor-showers to find out more.

Tuesday, May 13, 2014

GBTimelapse, TB3, and a Mast for a Holy Grail

We waited through the weather for an opportunity to get a good day-to-night Holy Grail with sky and reflection, and it paid off. We used GBTimelapse to control an inaccessible eMotimo TB3 for pan/tilt and aperture-pull mounted atop a Willburt mast. Although the TB3 was out of reach, GBT can setup the start and end points and control the motion. 


The video breaks down a lot of the details of the shot and the process. It was shot in JPEG with no post processing other than a crop to 16x9. GBTimelapse adjusted the exposure automatically and pulled aperture from f/22 to f/2.8 as the sun set. The time-lapse interval was ramped from 10 to 36 seconds and the color temperature was ramped from 5000°K to 4000°K. We had to change the tilt end point while the time-lapse was running to get a better shot of the night sky.

Make sure to watch the video in HD so you can see the star detail and look for the wild turkeys across the pond about 18 seconds in.


Thursday, April 24, 2014

GBTImelapse Aperture Pull

A few nights ago we took brought out the equipment and took advantage of a great night sky. Using GBTimelapse and an eMotimo TB3 we shot an automatic aperture pull/ramp for a seamless day-to-night shot. In the video posted below you can see the eMotimo TB3 tied to the camera and the video produced, flicker-free from daylight hours into deep night.

The aperture is listed on screen to see the process in action. If you would like to read more about the technical details look back at these posts: Eliminate Flicker and GBTimelapse/eMotimo Aperture Ramping.

Stick around after the video to see an explanation of the aperture pull/ramp.


The figure above shows how the aperture was smoothly ramped from f/22 when the sun was 4° above the horizon to f/2.8 when the sun was 5° below the horizon during twilight. You can specify the start and stop points as well as the curve to follow, (linear, logarithmic, or cosine as shown here). I like to use the cosine curve because the gradual change at low f-numbers makes lens vignetting changes less noticeable.

Saturday, April 05, 2014

ESO Ultra HD Expedition

The ESO Ultra HD Expedition (read: GBS Sponsors ESO Ultra) continues with great surprises around every corner. Leader Christoph Malin posted to Facebook Wednesday morning additional photos of the project underway. 


Above is one of the recent stills taken, pre edit, where Malin explains, "I am extremely happy with this frame out of a time-lapse... Lucky imaging ;) Big grin. These are the nice moments where the Universe says, "OK, you worked hard, so here's a fireball". As well as Mars and Spica are rising up the Horizon. Can't wait to process this TL, there are some in the backlog ;)"

Below is a photo of Malin setting up his rig before one sunset. (Credit ESO/UHD Team)


From Malin's blog: "Christoph set up his equipment in the meantime. His equipment ran independently throughout the night allowing his “TimeLapse Bots” do the work – an autonomous GBTimelapse Rig, using Intecro XTPower powerbanks for powering a Emotimo TB3 motion control and a Canon 6D. Using this easy-to-use and intuitive set-up of equipment really extends our creative possibilities. It has been the perfect addition to our equipment collection since it allows us to get slow slides, tilts and pans into our time-lapses as the stars move over ALMA. They are so versatile and take all the dust from the desert."

It looks like his rigs, that he refers to as his "bots" (read: Malin on Time Lapse Front) are working as designed.

Good luck to Malin as the expedition continues. We will keep bringing you fresh information as it comes in.

Read more about the ESO Ultra HD Expedition at their site https://www.eso.org/public/outreach/ultra­high­definition/

Wednesday, April 02, 2014

Sacramento Timelapse using GBDeflicker

Granite Bay Software is located on the outskirts of Sacramento and loves to see our city in the spotlight. Posted two days ago and already a Vimeo Staff Pick, Sacramento Timelapse by Justin Majeczky is a stunning example.


Justin only recently moved to the area and saw the beauty of what the region has to offer. His talents allowed him to show off the city and the surrounding farmlands.

Timing his shots to Colourmusic's "You For Leaving Me" was a nice touch and added a lot to the overall feel. He used eMotimo motion control (emotimo.com), Dynamic Perception (dynamicperception.com), and GBDeflicker for parts of the short and it's 20,000 shots.

We have been in contact with Justin about his project and told him, "I've lived here all my life, this is the best the city has ever looked."