Thursday, January 13, 2022

Full SD Card image of GBTPi with Raspbian OS Buster Version

 A shortcut way to install GBTPi on your Raspberry Pi is to do it in one step by downloading a complete SD card image from Dropbox. 

What you need:

  • A Raspberry Pi 4 model B.
  • An Internet connection.
  • A Windows computer to download the disk image
  • An SD card reader (USB or built-in computer).
  • A 32 GB SD card.
  • A micro-SD / SD adapter (often included with the SD card).
  • A copy of Win32DiskImager installed on your Windows PC
  • You may need a copy of SDCardFormatter to format your SD card

Follow these steps:

 1) Download the SD card image to a file on your PC using this link. It is 32GB so it may take some time depending on your connection speed.

https://www.dropbox.com/s/7whb5g1qoeit2jy/GBTPiDiskImage220112.img?dl=0

2) Download and install Win32DiskImager onto your PC.

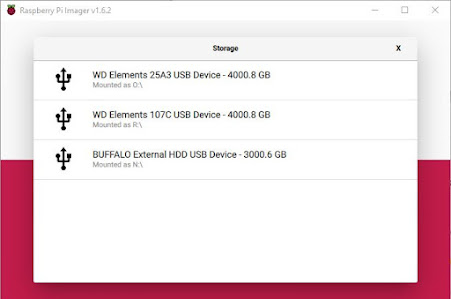
3) Run Win32DiskImager and select the SD card image file and your SD card device.


4) Write the image to your SD card

5) Boot your Raspberry Pi with the SD card.

You will have GBTPi (free trial version) installed on Raspbian ready to run. Raspbian is setup to run headless and with HQ camera support enabled.

You should check to see if there is a newer version of GBTPi available for download from this link...

  https://www.granitebaysoftware.com/Download/DownloadAll.aspx?id=rpi

installing the Buster version of Raspbian

GBTPi (GBTimelapse for Raspberry Pi) requires the Buster version of Raspbian. At the time of this writing the newer Bullseye version is unstable and is missing critical components. 

Buster Desktop

Bullseye Desktop

If you aren't running Buster, you can download Raspbian Buster onto a SD card using a Windows PC or Mac. Then insert the SD card into your Raspberry Pi. and reboot. 

What you need:

  • A Raspberry Pi 4 model B.
  • An Internet connection.
  • A computer (Windows, Mac, or Ubuntu) to download and flash Raspberry Pi OS.
  • An SD card reader (USB or built-in computer).
  • A minimum 32 GB SD card.
  • A micro-SD / SD adapter (often included with the SD card).
  • A complete Raspberry Pi setup with screen and keyboard.

Follow these steps:

1) Download the Raspberry Pi disk imager onto your PC or Mac from this link… https://www.raspberrypi.com/software/

2) Install and run the Raspberry Pi Imager on your Pc or Mac and click “Choose OS

3)  Select “Raspberry Pi OS (other)”.  


4) Select "Raspberry Pi OS (Legacy)" , a port of Debian Buster with desktop


5) Click “Choose Storage” and select the device for your SD card (not shown in the image below)


6) Click “Write” to copy the OS to your SD card


7) Insert the SD card in your Pi and power up.